
Page 78 - LIT-18626-12-56
P. 78
Trouble recovery
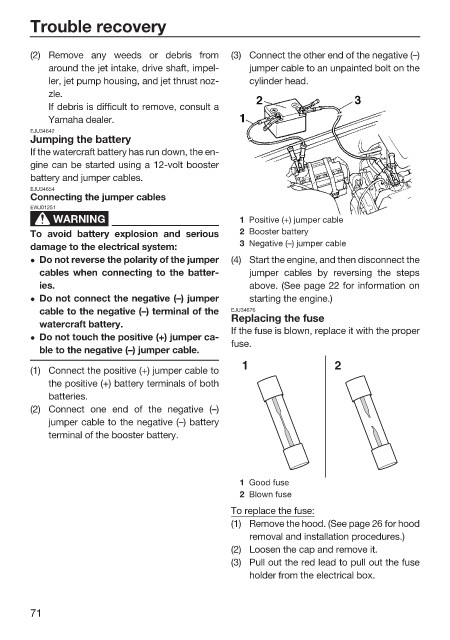
(2) Remove any weeds or debris from (3) Connect the other end of the negative (–)
around the jet intake, drive shaft, impel- jumper cable to an unpainted bolt on the
ler, jet pump housing, and jet thrust noz- cylinder head.
zle.
If debris is difficult to remove, consult a
Yamaha dealer.
EJU34642
Jumping the battery
If the watercraft battery has run down, the en-
gine can be started using a 12-volt booster
battery and jumper cables.
EJU34654
Connecting the jumper cables
EWJ01251
WARNING 1 Positive (+) jumper cable
To avoid battery explosion and serious 2 Booster battery
damage to the electrical system: 3 Negative (–) jumper cable
z Do not reverse the polarity of the jumper (4) Start the engine, and then disconnect the
cables when connecting to the batter- jumper cables by reversing the steps
ies. above. (See page 22 for information on
z Do not connect the negative (–) jumper starting the engine.)
cable to the negative (–) terminal of the EJU34676
Replacing the fuse
watercraft battery.
If the fuse is blown, replace it with the proper
z Do not touch the positive (+) jumper ca-
fuse.
ble to the negative (–) jumper cable.
1 2
(1) Connect the positive (+) jumper cable to
the positive (+) battery terminals of both
batteries.
(2) Connect one end of the negative (–)
jumper cable to the negative (–) battery
terminal of the booster battery.
1 Good fuse
2 Blown fuse
To replace the fuse:
(1) Remove the hood. (See page 26 for hood
removal and installation procedures.)
(2) Loosen the cap and remove it.
(3) Pull out the red lead to pull out the fuse
holder from the electrical box.
71